ノート
完全なサンプルコードをダウンロードするには、ここをクリックしてください
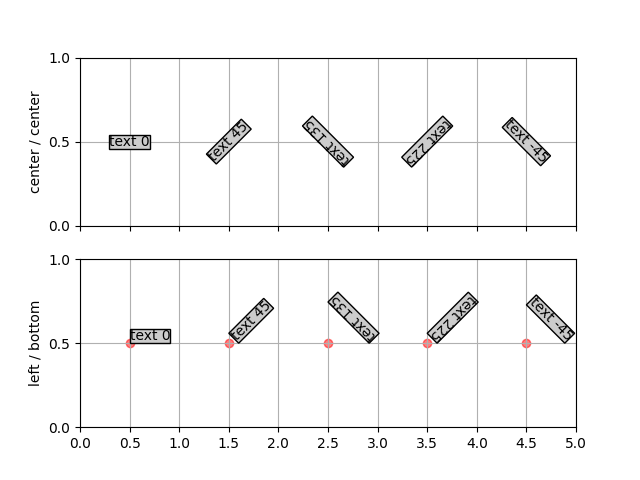
デフォルトのテキスト回転デモ#
Matplotlib がデフォルトでテキスト レイアウトを行う方法は直感に反するものがあるため、この例はそれを少し明確にするように設計されています。
テキストは、境界ボックス (インクの四角形を囲む四角形のボックス) によって配置されます。操作の順序は、回転、整列です。基本的に、テキストは (x, y) の位置で中央に配置され、この点を中心に回転し、回転したテキストのバウンディング ボックスに従って位置合わせされます。
したがって、左下揃えを指定すると、回転したテキストのバウンディング ボックスの左下がテキストの (x, y) 座標になります。
しかし、写真は千の言葉に値します!
import matplotlib.pyplot as plt
import numpy as np


def addtext(ax, props):
    ax.text(0.5, 0.5, 'text 0', props, rotation=0)
    ax.text(1.5, 0.5, 'text 45', props, rotation=45)
    ax.text(2.5, 0.5, 'text 135', props, rotation=135)
    ax.text(3.5, 0.5, 'text 225', props, rotation=225)
    ax.text(4.5, 0.5, 'text -45', props, rotation=-45)
    for x in range(0, 5):
        ax.scatter(x + 0.5, 0.5, color='r', alpha=0.5)
    ax.set_yticks([0, .5, 1])
    ax.set_xticks(np.arange(0, 5.1, 0.5))
    ax.set_xlim(0, 5)
    ax.grid(True)


# the text bounding box
bbox = {'fc': '0.8', 'pad': 0}

fig, axs = plt.subplots(2, 1, sharex=True)

addtext(axs[0], {'ha': 'center', 'va': 'center', 'bbox': bbox})
axs[0].set_ylabel('center / center')

addtext(axs[1], {'ha': 'left', 'va': 'bottom', 'bbox': bbox})
axs[1].set_ylabel('left / bottom')

plt.show()