ノート
完全なサンプルコードをダウンロードするには、ここをクリックしてください
TeX を使用した数式のレンダリング#
rcParams["text.usetex"](デフォルト: False) を True に設定することで、TeX を使用してすべての Matplotlib テキストをレンダリングできます
。これには、TeX と、LaTeX を使用したテキスト レンダリングのチュートリアルで説明されているその他の依存関係がシステムに正しくインストールされている必要があります。Matplotlib は処理された TeX 式をキャッシュするため、式が最初に出現したときにのみ TeX コンパイルがトリガーされます。その後のオカレンスでは、レンダリングされたイメージがキャッシュから再利用されるため、高速になります。
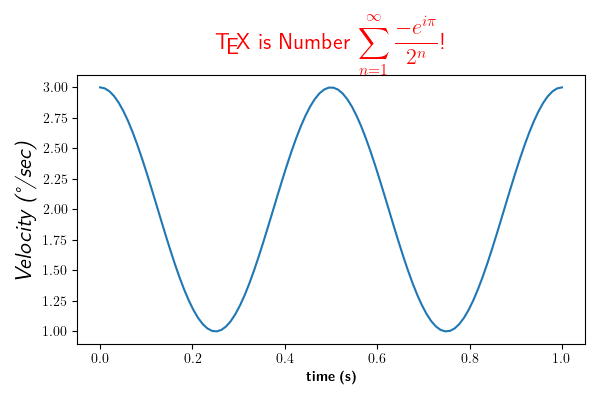
この例の y 軸ラベルなど、Unicode 入力がサポートされています。
import numpy as np
import matplotlib.pyplot as plt

plt.rcParams['text.usetex'] = True


t = np.linspace(0.0, 1.0, 100)
s = np.cos(4 * np.pi * t) + 2

fig, ax = plt.subplots(figsize=(6, 4), tight_layout=True)
ax.plot(t, s)

ax.set_xlabel(r'\textbf{time (s)}')
ax.set_ylabel('\\textit{Velocity (\N{DEGREE SIGN}/sec)}', fontsize=16)
ax.set_title(r'\TeX\ is Number $\displaystyle\sum_{n=1}^\infty'
             r'\frac{-e^{i\pi}}{2^n}$!', fontsize=16, color='r')

Text(0.5, 1.0652809399537557, '\\TeX\\ is Number $\\displaystyle\\sum_{n=1}^\\infty\\frac{-e^{i\\pi}}{2^n}$!')
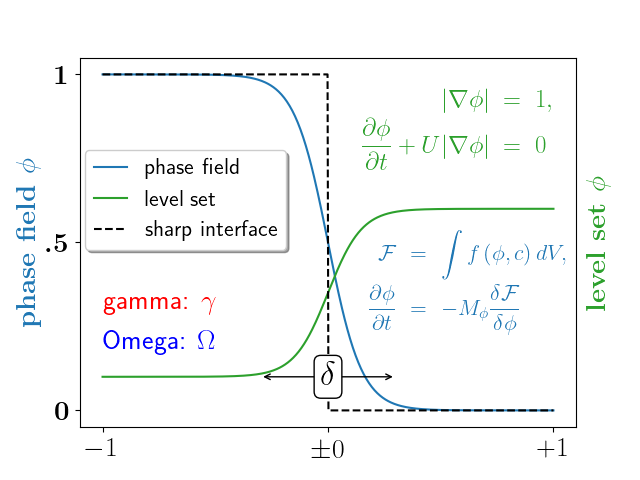
より複雑な例。
fig, ax = plt.subplots()
# interface tracking profiles
N = 500
delta = 0.6
X = np.linspace(-1, 1, N)
ax.plot(X, (1 - np.tanh(4 * X / delta)) / 2,    # phase field tanh profiles
        X, (1.4 + np.tanh(4 * X / delta)) / 4, "C2",  # composition profile
        X, X < 0, "k--")                        # sharp interface

# legend
ax.legend(("phase field", "level set", "sharp interface"),
          shadow=True, loc=(0.01, 0.48), handlelength=1.5, fontsize=16)

# the arrow
ax.annotate("", xy=(-delta / 2., 0.1), xytext=(delta / 2., 0.1),
            arrowprops=dict(arrowstyle="<->", connectionstyle="arc3"))
ax.text(0, 0.1, r"$\delta$",
        color="black", fontsize=24,
        horizontalalignment="center", verticalalignment="center",
        bbox=dict(boxstyle="round", fc="white", ec="black", pad=0.2))

# Use tex in labels
ax.set_xticks([-1, 0, 1])
ax.set_xticklabels(["$-1$", r"$\pm 0$", "$+1$"], color="k", size=20)

# Left Y-axis labels, combine math mode and text mode
ax.set_ylabel(r"\bf{phase field} $\phi$", color="C0", fontsize=20)
ax.set_yticks([0, 0.5, 1])
ax.set_yticklabels([r"\bf{0}", r"\bf{.5}", r"\bf{1}"], color="k", size=20)

# Right Y-axis labels
ax.text(1.02, 0.5, r"\bf{level set} $\phi$",
        color="C2", fontsize=20, rotation=90,
        horizontalalignment="left", verticalalignment="center",
        clip_on=False, transform=ax.transAxes)

# Use multiline environment inside a `text`.
# level set equations
eq1 = (r"\begin{eqnarray*}"
       r"|\nabla\phi| &=& 1,\\"
       r"\frac{\partial \phi}{\partial t} + U|\nabla \phi| &=& 0 "
       r"\end{eqnarray*}")
ax.text(1, 0.9, eq1, color="C2", fontsize=18,
        horizontalalignment="right", verticalalignment="top")

# phase field equations
eq2 = (r"\begin{eqnarray*}"
       r"\mathcal{F} &=& \int f\left( \phi, c \right) dV, \\ "
       r"\frac{ \partial \phi } { \partial t } &=& -M_{ \phi } "
       r"\frac{ \delta \mathcal{F} } { \delta \phi }"
       r"\end{eqnarray*}")
ax.text(0.18, 0.18, eq2, color="C0", fontsize=16)

ax.text(-1, .30, r"gamma: $\gamma$", color="r", fontsize=20)
ax.text(-1, .18, r"Omega: $\Omega$", color="b", fontsize=20)

plt.show()

スクリプトの合計実行時間: ( 0 分 1.076 秒)